You have just purchased a sophisticated product. We place great importance on the workmanship and the high quality of the materials used. If you have any questions which are not answered in this manual, please do not hesitate to contact us directly, or your Fresh Breeze dealer. from Fresh Breeze Table of Contents 1. Disclaimer and exclusion of liability .1 2. For your safety.2 3. Features of the paraglider .3 3.1 Description of the Starlix.3 3.2 Who is the Starlix suitable for?.3 3.3 Connecting the Starlix to harnesses.3 3.4 Winch-towing .3 3.5 Description of the riser. 4-5 4. Setting up the Starlix and test-flying.6 4.1 Laying out the paraglider and pre-flight check .6 4.2 Five-point check .6 4.3 The first flight .7 4.4 AdjuStarlix the main brake lines .7 4.5 AdjuStarlix the speed system .8 5. Motorised flight.9 5.1 Normal flight . 9-10 5.2 Rapid descents. 10-12 6. Flying without a motor .13 6.1 Normal flight .13 6.2 Rapid descents.14 6.3 Instructions for extreme flying and dangerous situations . 14-16 7. Looking after your paraglider .17 7.1 Transporting and storing the paraglider .17 7.2 Checking the lines .17 7.3 Cleaning and repairing the paraglider .18 8. Inspection.19
9. Warranty .20 10. Internet product information and safety notices .20
1. DISCLAIMER AND EXCLUSION OF LIABILITY Use of this paraglider is solely at the USER'S OWN RISK. THE CERTIFICATION AND THE WARRANTY SHALL BE RENDERED INVALID if changes of any kind (including changes to the brake lines) or improper repairs are made to this paraglider or if any inspections are missed (annual and 2- yearly check). Pilots are responsible for their own safety. Before every flight, the pilot must check the glider's air- worthiness and must launch only if it is fit to fly. The pilot must check the weather forecast and only fly if both current and forecasted conditions guarantee a safe flight. The glider may only be used with a pilot's licence which is valid for the area or under the supervision of an approved flying instructor. There shall be no liability on the part of third parties, in particular the manufacturer and distributor. In terms of the warranty and guarantee conditions, the paraglider may not be flown if any of the following situations exists:
1. the inspection period has expired, you have carried out the inspection yourself, or the
inspection has been carried out by an unauthorised inspector;
2. the take-off weight does not fall within the permissible overall take-off weight range; 3. the glider is flown in rain or cloud or when there is fog or snow; 4. there are turbulent weather conditions or wind speeds higher than 15 km/h; 5. the glider is used for aerobatics / extreme flying or flight manoeuvres at an angle greater than
6. the pilot has insufficient experience or training; 7. the wrong equipment or inadequate equipment (reserve, helmet, footwear etc) is used; 8. the glider is used for winch launching using a winch which has not been inspected or by non-
9. modifications have been made to the canopy, lines or risers which have not been approved;
10. the glider is opened in free fall - this is not a parachute.
2. FOR YOUR SAFETY
The use of paragliders is subject to various regulations. They may not be
flown without a valid certification. Any attempt to fly is highly dangerous.
This manual does not replace the need to attend a paragliding school.
The paraglider may only be used for the purpose for which it is designed.
Use of the paraglider is at your own risk. The manufacturer is not legally
responsible for any personal injury or material damage which occurs in connection with FRESH BREEZE paragliders.
A specialist must test-fly the paraglider. The test-flight must be recorded on
Do not under any circumstances tow your paraglider with a car, motorboat or
any similar vehicle which is not fitted with a suitable towing system operated by an experienced winch operator.
Before towing, ensure that the winch operator has the appropriate training
Aerobatics are prohibited in Germany - check the situation in your country.
Do not under any circumstances alter the construction of your paraglider. If
you do, any claims under the warranty will not be accepted and the certification will lapse.
When you fly for the first time, use training slopes only.
When flying, always wear a helmet, gloves, suitable clothing and shoes
Only fly if the wind speed, direction and weather conditions guarantee a safe
This manual contains more information concerning your safety. This information is indicated by two symbols.
Caution! Accident risk!
This symbol indicates risks which may arise. We also explain how to avoid the risk or how you should react if the situation arises. Tip This symbol is used when we give advice on correct handling of the paraglider, how to protect it from damage and general information. 3. FEATURES OF THE PARAGLIDER
3.1 Description of the STARLIX
The STARLIX is designed for pilots who fly paramotors or paramotor-trikes but who also fly in thermal conditions or in dynamic lift and do not want to have to get a second paraglider for this type of flying. With its unique riser system and within the relevant weight limits (see Technical Data), the STARLIX has both DHV and DULV (German Ultralight Association) classification. With closed trimmer and locked trimmer loop (see Description of the riser) the STARLIX has DHV 1-2 classification and, even in free flight, has high performance with a high level of passive safety. In motorised flight, the pilot is able to increase the cruising speed using the trimmer and to counter the torque effect. Furthermore, there is a choice of two hang points for the riser so that the STARLIX can be best adapted to the particular motor used. 3.2 Who is the STARLIX suitable for?
The STARLIX is intended for a wide range of pilots, from the beginner to the safety-conscious cross- country pilot. Its high passive safety and straightforward handling are impressive, whether it is used with a motor or for free flight. Classifi- 3.3 Connecting the STARLIX to other harnesses
The STARLIX can be connected to any modern harness which has DHV “GH” harness classification. You can find out more about this on the DHV website at www.dhv.de. Harnesses with ample back protection are not suitable for flying with a motor. The harness used must be registered with the DULV, along with the paraglider and the motor. The DHV is teStarlix paragliders with a distance between the harness carabines (center to center) of 42 cm. Adjustments divergent from that (especially greater distances) can affect the flying characteristics of your canopy – headword: stable spiral dive!
3.4 Winch-towing
The STARLIX is suitable for winch-towing. Make sure that the brakes are unclipped when the paraglider takes off. Use weight-shifting to assist the steering.
Winch-towing is only recommended and permitted if:
the pilot has completed the appropriate training.
the winch and release used have a certificate of compliance which covers the
the winch operator has adequate training which includes the towing of paragliders.
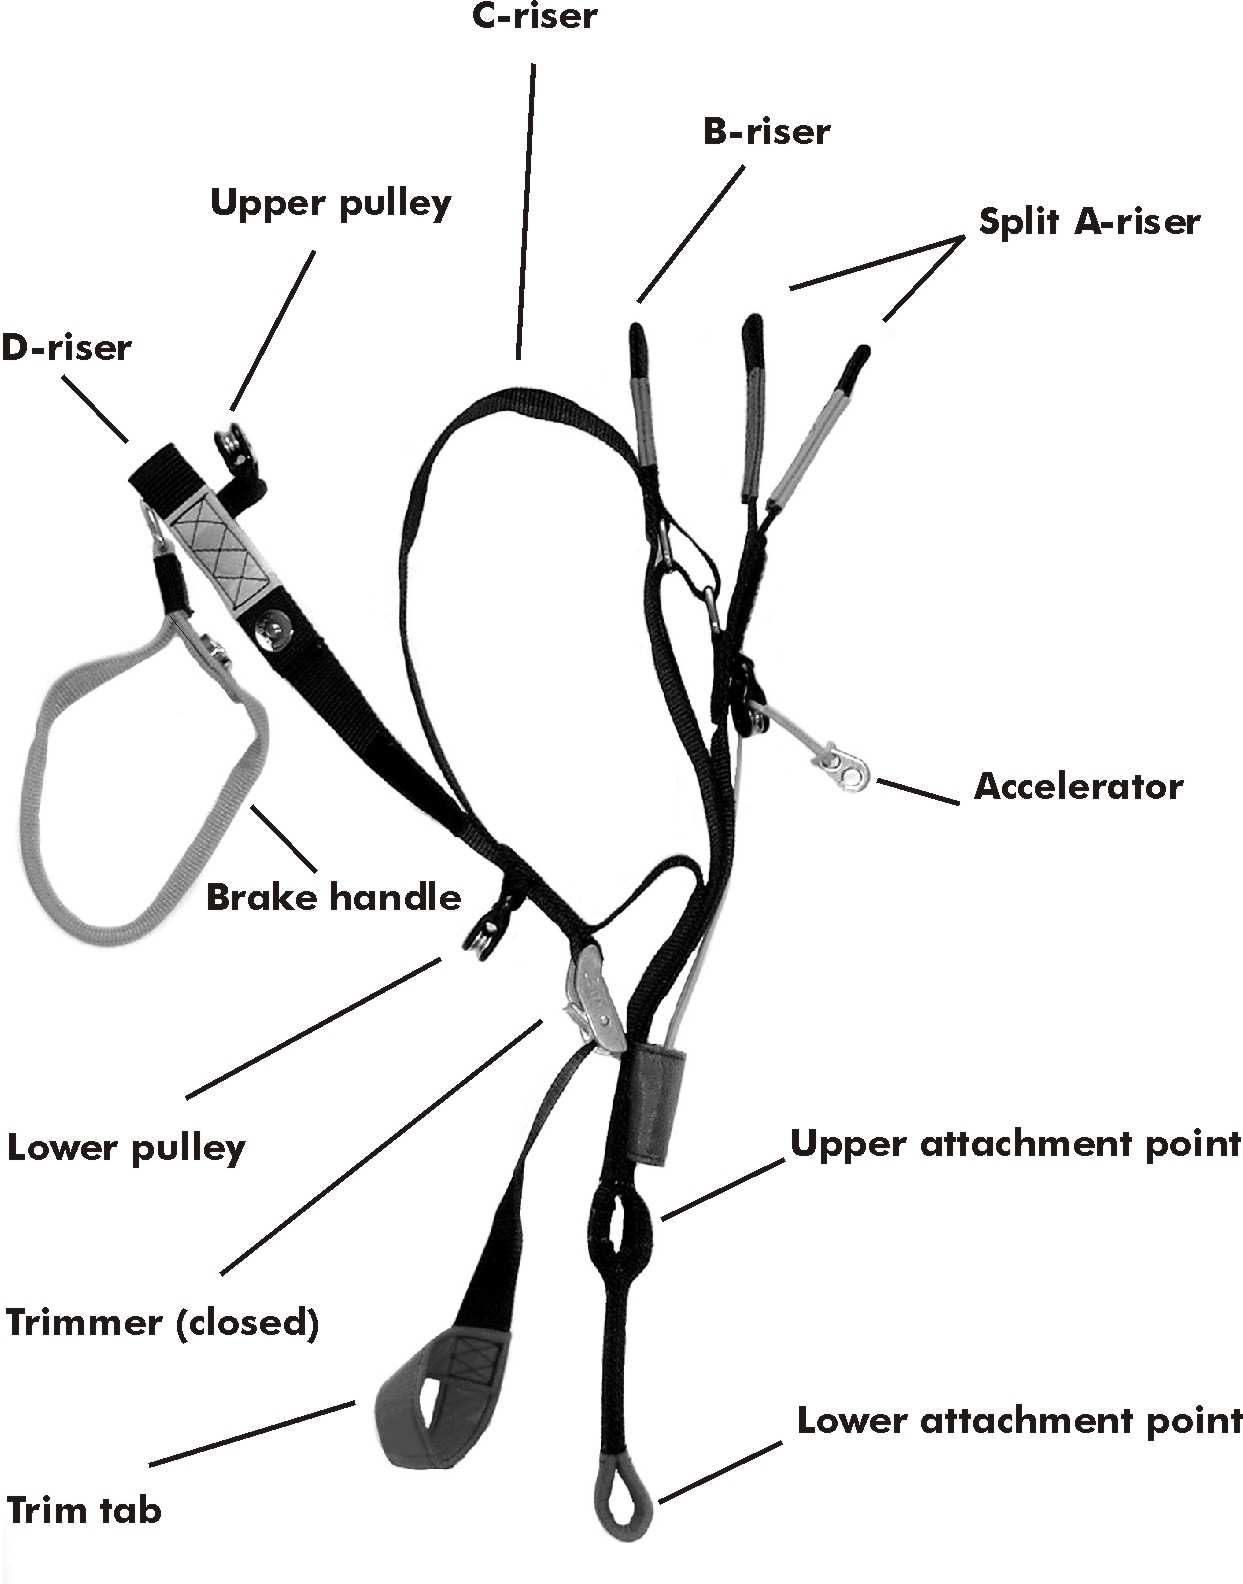
3.5 Description of the riser
Attention!
Possible canopy collapses in turbulent air will become more dynamic as the start weight is increased. Decreasing the canopy´s angle of attack by opening the trimmers will intensify this effect. If the take-off weight for motorised flight is more than 180 kg (STARLIX 250) the trimmer may only be used to counter the torque effect (a maximum of 3 cm on one side)! It is not certified by the DULV to fully open the trimmers at a take-off weight of more than 180 kg! The STARLIX riser is fitted with two hang points at different heights. The riser can be either long or short depending on the height of the motor, so as to ensure that the lines and the brake loops can be reached. If the brake handles are still hard to reach despite having chosen the right hang point on the riser (e.g. when the trimmer is open) then the main brake line can be fed through the lower pulley on the D-riser. For free flying we recommend always to use only the upper pulley.
It is crucial to ensure that this change does not cause the brakes to be activated when you don't want them to be. The paraglider should be inflated and controlled each time the brake line position is changed. Note that the available braking distance is shortened by using the lower pulley.
The trimmer allows the pilot to increase the cruising speed and to counter the torque effect. We recommend that you always have the trimmers closed when launching or landing.
The speed bar must not be used in motorised flight.
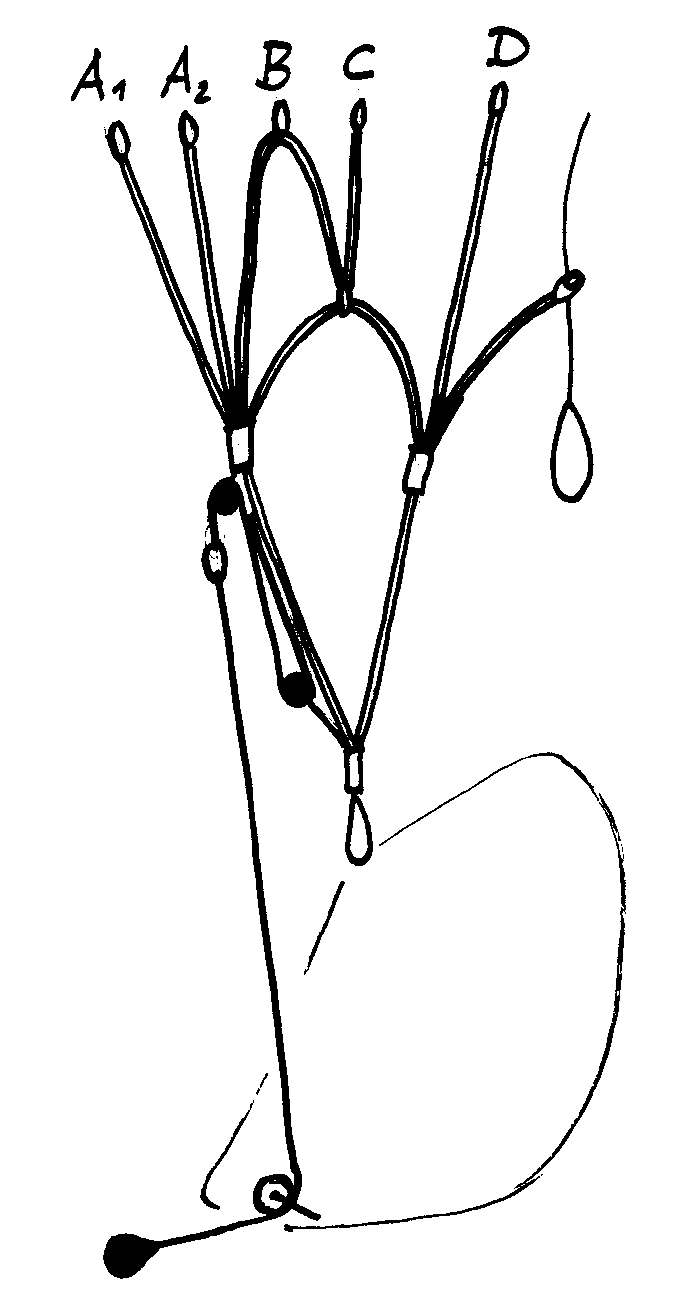
DHV – riser adjustment: The trimmer must be fully closed when flying without the motor and the trimmer loops (shown in red) and the lower hang-point (red) must be attached in the harness carabiner in such a way that the trimmer cannot be opened during flight. This is required for the glider to have DHV 1-2 classification. Follow the diagram below. Caution! Accident risk when locking the trimmer loop (DHV adjustment) It is most important that the trimmer was closed completely before locking the trimmer loop (red) in the harness carabine. If it was not, there is a risk of deep stall, because if the trimmers are fully or partly open, the C- and D-risers would be shortened in relation to the A- and B-risers. 4. SETTING UP THE STARLIX AND TEST-FLYING 4.1 Laying out the paraglider and pre-flight check
Laying out Place the paraglider with the upper surface against the ground and spread it out so that paraglider
Carefully separate all the rigging-lines and take care that no lines are underneath the canopy, tangled or caught up in any way. The STARLIX can be reverse launched easily with a wind speed of just 3m/s.
Pre-Flight Before launching, always check the following:
Are there any tears in the glider or other damage?
Are the brake lines clear and tightly connected to the handle?
Are the quick links fastened securely to the lines and to the risers?
Are the risers and seams in good condition?
Is the handle for the reserve chute secure?
4.2 5-point check
We recommend that you carry out the following 5-point check immediately before launching:
1. Is the canopy arranged in a half moon shape and are all the air-entrances open? 2. Are all the lines untangled? Are there any lines under the canopy? 3. Check your equipment: harness, carabiners, reserve, helmet. Are the leg straps done up? 4. Do the wind-direction and strength ensure a safe flight? 5. Are the airspace and launch area clear?
4.3 The first flight
Tip Carry out your first few flights only during stable weather conditions, and in a familiar
To start with, you should steer gently and carefully so that you can get used to the reactions of the paraglider while you are not under stress.
Caution! Accident risk!
Do not overestimate yourself! Don't let a paraglider that can easily be maneuvered or the behaviour of other pilots make you careless.
4.4 AdjuStarlix the main brake lines
The main brake lines must be adjusted whenever you go from motorised flight to free flight and vice versa.
Securing
The main brake lines must be fastened so that the mark is visible slightly above the knot
brake lines
Correctly installed brake lines have about 10 cm of feed. This is how far you must pull
adjustment the brakes down before the trailing edge of the canopy starts to move downwards and
start braking. The manufacturer has fed the brake lines through the upper pulley and pre-set them with 10cm of feed. The length of the brake line is indicated by a reference mark. It can be extended in relation to the mark.
If the brake lines are too long, the paraglider reacts slowly and is difficult to land.
However during the flight you can twist the brake lines around your hands to minimise this problem. Adjust the brake lines to a suitable length after you have landed. Caution! Accident risk!
If the brake lines are too short, the following risks could arise:
the paraglider does not launch well and there is a risk of deep-stall.
the paraglider's behaviour in extreme flying is dangerous.
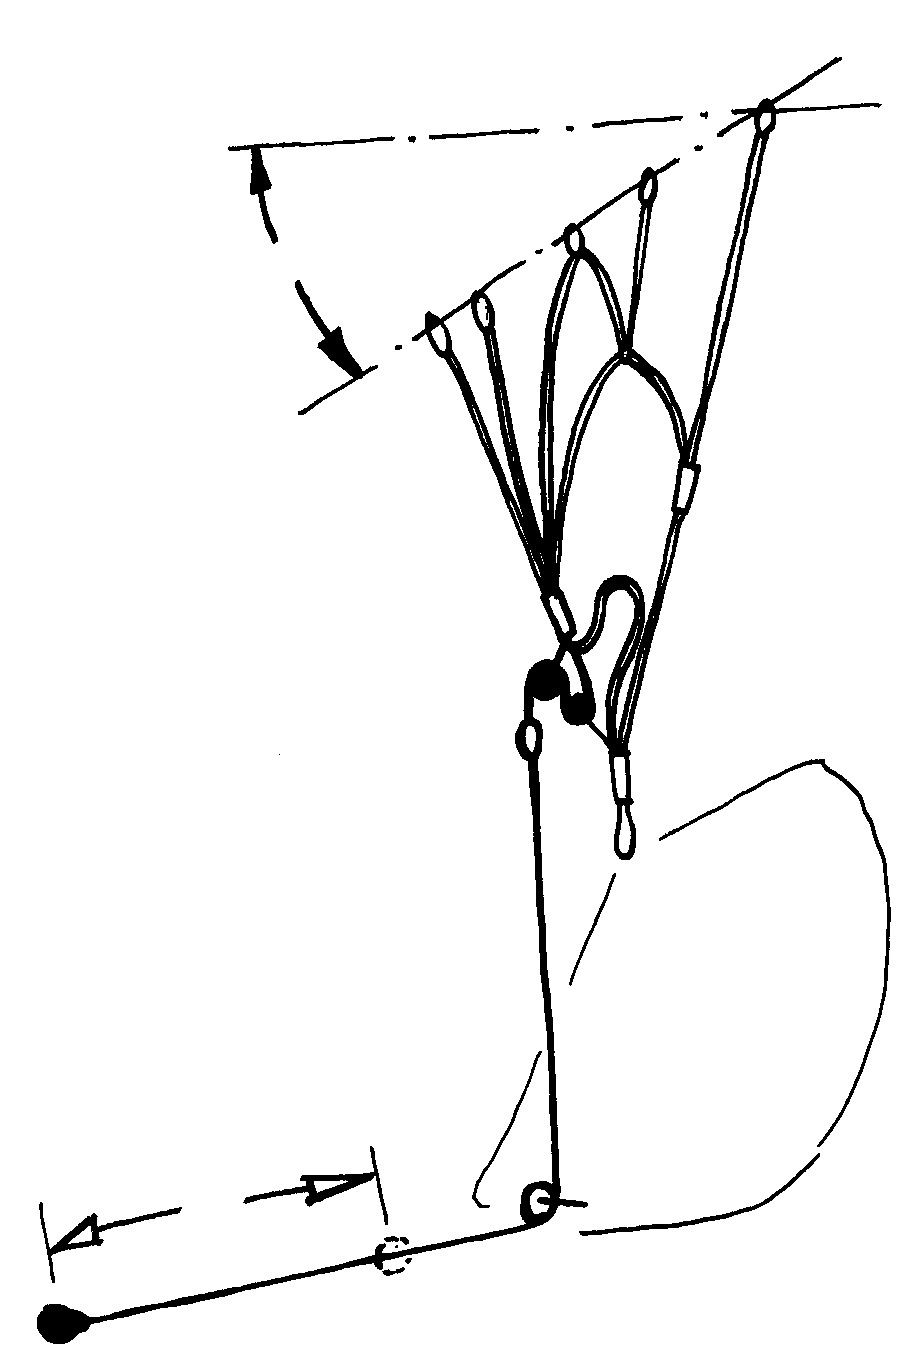
4.5 AdjuStarlix the speed system (for non-motorised flight) Although the STARLIX is already trimmed to a sufficiently high basic speed, it is also equipped with a speed system. You will use it in particular if there is a strong headwind, when you fly over valleys or if you want to leave a dangerous area quickly.
Function
The A-, B- and C-risers can be shortened by using the speed bar. This decreases the
Diagram left: unaccelerated right: accelerated
Caution! Accident risk!
Disturbances (e.g. collapses) are more dramatic with increased speed than when the
glider is unaccelerated. Because of the increased risk of collapse, we strongly recommend that you do not use the speed system in turbulent areas or near the ground. Test the system in advance. It is best to do this suspended from a frame. Tie the lines to the speed bar at the right length. You should still be in a comfortable flight position even when the speed system is used to its full extent.
Adjustment
Do not make the speed system too short or you will not be able to access it easily. You will not be able to use the speed system to its full potential if it is too long.
5. MOTORISED FLIGHT 5.1 Normal flight Launch
The STARLIX has excellent launch characteristics both with and without a motor. It shoots forward only a little and therefore hardly needs any braking. The glider should rise up without any delay and in a controlled way. In normal conditions, the STARLIX rises smoothly and consistently through all stages of launch and this considerably facilitates the launch process. If you are starting from a standing position, we recommend that you do not accelerate until the canopy has risen above the propeller wash. The motor thrust should be as horizontal as possible (pay attention to the position of your body). The STARLIX also has excellent rising behaviour and is easy to control when it is used with a paramotor-trike. We recommend that you keep the trimmers closed when launching. If the terrain is very steep and/or there is a head wind, the STARLIX must also be gradually braked.
Cruising
The STARLIX is most efficient when cruising if the trimmers are in the open position. A trimmer can be closed again as much as is needed to counter the torque effect of the motor. If there are very turbulent conditions, the trimmers should not be used, since the canopy stability decreases because of the lower angle of attack.
The STARLIX has very balanced turn behaviour with great safety allowances in its steering. Flat turns are just as easy as dynamic turns with high banking. The increased sink in the turn can be compensated for by accelerating. A little more brake is needed to counter torque effect if you want to achieve the same dynamics and banking as you get when turning in the direction of the torque.
Be careful when flying in your own wake!
Flying in
Although there is less susceptibility to collapse with a motor running than in free flight
turbulence because of the higher surface loading and the increased angle of attack, the trimmers
should always be closed in strong turbulence. When flying in turbulence, apply the brakes slightly (about 20%) and try to keep the canopy above you by actively working the brakes. This helps you to stop the tips of the wing collapsing. If a wing tip should nevertheless collapse, it is important to maintain your direction and if necessary steer away from any obstacles. You should not 'pump' the wing to make it reopen more quickly until your flight is stable again. This must be done somewhat more energetically because of the generally higher wing-loading with a paramotor. When flying in strong thermals, release the brakes and reduce the motor's revs per minute so that you do not go into a dynamic stall. However, when you are leaving a thermal, brake the canopy well and increase the rpm so as to avoid pitching forward and a possible frontal tuck. Tip: If you experience a collapse, counter-brake the canopy until you stabilise the glider in level flight. Too little counter-brake is better than too much.
You should not brake the STARLIX too strongly before landing because of the
comparatively high surface-loading. We recommend that you completely release the
stationary
brakes in the final approach and then, when you are approx. 1-2m above the ground,
propeller
gradually apply them until they are 100% on (flare).
Please be aware that the length of the brake lines was set to the optimum level for your
motor before the first flight so that there would be sufficient braking distance for landing.
You have the option of using the motor to assist the landing approach.
with motor
The height and speed can be controlled using the brakes and the rpm until you touch
Caution! Accident risk!
When you are flying near the ground, always maintain enough speed (well above the stall limit).
5.2 Rapid descents There are many situations when you need to lose height rapidly to avoid potential dangers e.g. the upcurrent from a cumulus cloud, an approaching cold front, a storm front etc. Below we explain various ways to make a rapid descent which can also be carried out safely with a motor if the pilot has the necessary knowledge and if they are correctly executed.
With all rapid descent methods, the trimmers should be completely closed and the rpm's reduced to zero. All of the manoeuvres are more dynamic than when you fly without a motor because of the take-off weight increases with the motor.
Spiral dives The spiral dive is the classic method for making a rapid descent with a sink rate of up to
14 m/s in normal flight situations, and up to 20 m/s in extreme flight situations. It is particularly suitable where there is a high ascent rate and little wind. Spiral dives with a sink rate above 14 m/s are not tested on certification; this exceeds the manufacturer's limits.
Whilst flying at full speed, start to apply the brake on one side. This will steer the
paraglider into a turn with a strong bank. You can tell that you are in a spiral dive if you are being pressed hard against your seat (high centrifugal force). When you are in a spiral dive, you should steer very carefully because the paraglider will react immediately. Banking and rate of turn increase if braking efficiency increases. Look down before and during a spiral dive so that you can tell how far you are from the ground! Tip
There is an increased negative tendency when you begin the manoeuvre given the torque effect of the motor.
Recover from the spiral dive slowly and carefully. If you release the brakes too quickly, the increased speed can cause the wing to climb, become unsettled, or partly collapse. Because of the reduced opportunity in motorised flight to use weight-shifting, you must always recover actively from the spiral dive with the outside brake.
Caution! Accident risk!
With spiral dives, very high turn speeds can be reached, with an increase of the
acceleration due to gravity. So be careful when you try this!
Do not continue the spiral dive too long; you could lose consciousness.
Never attempt this with less than 150 to 200 meters ground-clearance.
Spiral dives with "big ears" lead to extreme loading of the open section of the
canopy. This move is prohibited in Germany.
B-line stall
The B-line stall is another way to descend rapidly and has a sink rate of approximately
8 m/s. It can be used where there is an average ascent rate and little wind, however, in motorised flight has limited use as a rapid descent method.
Grasp both of the B-risers at the coloured mark. Pull both of them down slowly and
evenly until the airflow is gone and the wing goes into a vertical descent flight mode.
The B-risers should then be held in the same position to ensure a gentle descent. Check before and during the B-line-stall that the airspace beneath you is free.
Return the B-risers to their normal position quickly and evenly. If you put the B-risers
back too slowly, a deep stall or negative spin could occur.
Caution! Accident risk!
The canopy speeds up after the B-risers have been released. Under no circumstances should you apply the brakes at this time. Do not under any circumstances accelerate when performing this manoeuvre - there is the potential for lines to twist.
Tip
If the paraglider does not speed up immediately because recovery is too slow or for some other reason, accelerate using the speed system or pull the A-risers forwards.
"Big ears" is another way to descend quickly and has a sink rate of approximately 3 to 5
m/s. The forward speed stays the same. It is suitable for avoiding a dangerous situation
where there are high ascent rates and strong wind.
Pull both outer A-risers downwards. You can now descend safely on the stable middle
part of the wing. Steer by weight-shifting The brakes must not be applied during the
The "ears" will usually open automatically when you release the A-risers. You can assist
Caution! Accident risk! When the technique of "big ears" is used, there is a higher load for the line groups which are still weight-bearing. Do not fly any extreme manoeuvres with "big ears". 6. Flying without a motor 6.1 Normal flight
Pay attention to the riser set-up (see point 3.5).
Best glide
Best glide is reached in calm conditions without using the brakes.
You will reach minimal sink with the brakes applied about 20-30%. More brake will
reduce the forwards motion and increase the sink. This is often helpful when coming in
to land. With flat turns in thermal conditions, both brakes should be applied and the
radius of the circle corrected using the brake on the outside of the turn.
As we said, the technique described above is suitable for flat turns. However, to enter a
thermal or to achieve greater banking, brake on one side only. Even though the
STARLIX has no negative tendency, this should always be done carefully.
Limited steering of the STARLIX is possible using the rear risers if you are unable to
steer using the brake lines. However, you should only do this in an emergency and take
Flying in
Use the brakes as described in point 5.1 (Fying in turbulence).
turbulence Deep stall
In the test flights, we were not able to force a stable deep stall. However if the
paraglider should go into a deep stall, quickly pull the A-risers down until the paraglider
6.2 Rapid descent methods
Start the manoeuvre and recover as described in point 5.2 (Big ears).
In free flight, when the ears have been folded in, the speed bar can also be used. This
increases not only forward speed but also the sink rate. With sink rates up to 5 m/s and
a speed of over 45 km/h, this manoeuvre is suitable for flying away from "sucking"
clouds but, above all, for avoiding being forced into the lee when the wind is increasing.
A welcome side-effect is a noticeable increase in the stability of the canopy due to the
Note: With big ears, there is less braking distance until the glider stalls and the deep
stall limit comes closer. The simultaneous activation of the speed bar counters these
So you should always attach the speed system and also use it during big ears.
B-line stall
As described in point 5.2 (B-line stall). However, less effort is required to start the
Spiral dives
As described in point 5.2 (sprial dives).
We recommend a small wing-over to start the manoeuvre if the all-up weight is low.
6.3 Instructions for extreme flying and dangerous situations Dangerous Extreme flying with a motor and full load are dangerous and therefore cannot be tested. situations
They must be avoided at all costs. The manoeuvres described below relate to the DHV-
take-off weight (without motor) and should help to characterise the glider. Tip
These instructions do not replace safety training or specialised literature. We recommend that you undertake special safety training which will prepare you for extreme situations.
Caution! Accident risk!
Always keep within the recommended limits. Do not perform aerobatics or extreme flying manoeuvres, such as spirals with "big ears". This will prevent accidents caused by over-loading the glider.
Deep stall
Various things can cause a paraglider to deep stall, e.g. shrinkage of the C and D lines as a result of dampness or flying in the rain. The airflow from the front of the glider gradually breaks away towards the back and the canopy sags, with the glider remaining upright. Paragliders are particularly susceptible to deep stalls if the wing loading is too low. C and D lines which are too short, for example, can often be recognised because launch behaviour deteriorates. You can recognise a deep stall because there is less flight noise than normal. In addition, your sink rate will increase (4-5 m/s).
Recovery
Remain in an upright position and push the A- and B-risers in the direction you are flying, so as to shorten them by 5 to 10 cm. If you have a speed system, simply use it to accelerate.
Caution! Accident risk!
The minimum flight speed increases when there is rain or line shrinkage. This means that you must be very careful when using the brakes.
Front Stall
Strong turbulence can cause part or all of the leading edge of the glider to fold or tuck
under. Normally the STARLIX will immediately recover its normal flight position.
If the STARLIX does not immediately recover from a frontal tuck, brake quickly and
strongly with both steering-lines (brake lines) to re-inflate the glider.
Caution! Accident risk!
If you are not able to avoid a front stall during motorised flight, do not under any circumstances accelerate - this gives rise to the potential for the lines to twist. However, there is less risk of a front stall in motorised flight than in free flight because of the higher surface-loading and the increased angle of attack.
If there is turbulence, one side of the paraglider may collapse. Some of the cells deflate
and the paraglider could collapse or spin.
During test flights the STARLIX self-recovered on release of the A-risers which were pulled down and caused the collapse. It turned less than 90° and stabilised on its own.
Counter-brake slightly on the side of the paraglider that is still inflated to stop it
Counter-brake just enough that the paraglider continues to fly straight ahead.
If the wing has not yet self-recovered, pump with the brake on the side that has
collapsed in order to open it, making use of the full braking distance.
Caution! Accident risk!
Counter-braking too strongly can result in a stall on the inflated side.
Fullstall
A fullstall occurs if full brake is applied during the flight. The paraglider slows down,
surges backwards and deflates. If the brakes are held down, the canopy comes up over
the pilot again. The result is an almost vertical descent with a sink rate of about 8m/s.
Fully release the brakes within 3 seconds. If you release the brakes too slowly, the paraglider may spin. The spin stops automatically when the brakes are released completely.
Caution! Accident risk!
If the canopy has gone backwards, you must hold the brakes down. Otherwise the canopy can surge forward and, in an extreme case, end up underneath the pilot. Hold the brakes down until the canopy is above you again.
Spins occur when one side of the canopy stalls. The stalled part of the canopy continues to fly forward while the other side turns in the opposite direction.
Quickly release the brakes. Tip
1. Check whether you have released the brakes fully.
2. Is this does not work, use your reserve.
Caution! Accident risk!
In strong turbulence, always keep far enough away from rock faces and other obstacles. You need time and enough height to recover from extreme situations.
7. LOOKING AFTER YOUR PARAGLIDER
7.1 Transporting and storing the paraglider
Always transport your paragliding equipment in the special backpack and/or in the inner
Transport
Store all of your paragliding equipment away from UV light in a dry room which is well-
aired and has a constant temperature. Open the backpack and/or inner bag and the belt a little so that air can get in.
Sunlight, warmth and humidity can damage your equipment.
Temperatures lower than -10°C and higher than +50°C can make the wing unfit
to fly. The manufacturer's warranty will not apply if the paraglider is not stored at the correct temperature.
Never store a paraglider which was packed up while still wet.
If the paraglider gets wet, spread it out so that air reaches all parts of it. Since the fibres absorb water, it can take several days until it is completely dry. If a paraglider is stored wet, it can become unsuitable for flying after a short time.
7.2 Checking the lines Measuring
Measuring the length of the lines is part of the regular inspection. The lines must be measured with a load of 5kg to get comparable results. You will find the original line measurements under "technical data". Have your paraglider checked every two years by the manufacturer or an authorised inspector. In Germany, pilots have been able to carry out the inspection themselves since 01.07.2001 provided that they follow all of the requirements. This is laid down by the German "Gütesiegel” certification. Tip
We recommend an inspection every 50 to 100 flight hours or once a year.
7.3 Cleaning and repairing the paraglider
Cleaning
Only clean the paraglider with a soft sponge and clean water. Tip Harsh chemical substances, high-pressure cleaners or steamers will destroy the surface
layer. Clean the paraglider only if it is absolutely necessary.
Repairs should only be carried out by the manufacturer or a specialist recommended by
You can repair small tears in the wing yourself (not at the seams), using the material recommended by the manufacturer, as long as they are in places which do not bear heavy loads and they are not bigger than 3 cm.
Always replace lines that are damaged. If you need to replace damaged or worn-out parts, use only original parts or parts that have been authorised by the manufacturer. 8. INSPECTIONS
General
Failure to observe the inspection periods shall invalidate the warranty and certification.
A properly completed logbook will help you to comply with the periods.
There is more information on inspections and technical data in two separate booklets, both of which form part of this manual
1. Inspection instructions for Fresh Breeze gliders (required only in Germany
2. Service papers (1 booklet for each size and model)
In Germany, Fresh Breeze gliders must be inspected as follows (check the situation in
Inspection
A) Gliders used by schools and tandem gliders (if used commercially) must
be inspected every 12 months from the purchase date (as for the 2-yearly
check). B) Gliders for personal use and tandem gliders (not used commercially) must be inspected every 2 years from the purchase date. C) The paraglider must be inspected after 150 hours of use (including ground handling) if this occurs prior to the periods in A and B above.
Validity of If Fresh Breeze is to accept guaranty and warranty claims, all inspections must be inspection
carried out by FRESH BREEZE, or an inspection agent authorised by FRESH BREEZE.
The documentation and the result of the inspection must be clearly identifiable by the
inspector (date and place / name of inspector) and be entered near the glider information/certification sticker.
Inspections Pilots in Germany have been able to carry out the inspection themselves since by the pilot 01.07.2001. However, in this event, FRESH BREEZE's liability and warranty lapse.
There are more details on inspections in a separate booklet (Fresh Breeze paragliders
9. WARRANTY
General
The terms of the warranty are in the enclosed warranty card.
Please remember to return the warranty card to Fresh Breeze within 14 days after you
purchase the paraglider. The manufacturer must be notified immediately of any defects in the product, variations or changes in flight behaviour and any warranty claims and, if necessary, the glider must be made available for inspection by the manufacturer.
10. INTERNET – PRODUCT INFORMATION AND SAFETY NOTICES
Our website: www.fresh-breeze.de
There is also data and information about our products on the DHV website www.dhv.de
We hope you have fun and many enjoyable flights
This is an Open Access article licensed under the terms of the Creative Commons Attribution-NonCommercial-NoDerivs 3.0 License (www.karger.com/OA-license), applicable to the online version of the article only. Distribution for non-commercial purposes only. An Extremely Uncommon Case of Parasitic Infection Presenting as Eosinophilic Ascites in a Young Patient Kemal Oncua Yusuf Yazgana Mus
Department of Mathematics & StatisticsTIME: 3 hours. You are permitted to use one 8 1/2 × 11 “cribsheet”, but no other notesor papers, in this examination. 1. In a study of human blood types in non-human primates, a sample (assume it wasrandom!) of 71 orangutans were tested and 14 were found to have blood type B. (a) Construct a 90% confidence interval for the proportion of in